| ID |
Date |
Author |
Status |
Type |
Category |
Location |
Title |
|
224
|
Wed Oct 2 10:12:55 2024 |
Ronic Chiche | Under Process | issue | lasers and optics | Optical room | CELIA 100W laser amplifier repair |
this morning with Alice, we sent the Menhir 160MHz injected in a fiber (with 6mW at the end of a long fiber) into the laser amplifier, to look for leakage or damage in the first stages of the amplifier (the amplifier is totally off).
first of all, we checked for light scattering around the laser crate with a sensitive optical card => nothing
and then, we checked for light scattering inside the laser crate with an optical viewer => we just saw 1 or 2 small spots located at the end of an optical element at the 2nd stage level.
but it's difficult to understand the optical path and know the different elements with the 1st stage still in place.
we think it is mandatory to open the top of the crate and lift the 1st stage to have a better look inside the optical parts which are at the 2nd and 3rd stage levels:
we could remove the front side of the crate without any damage to any fibers in the crate.
we just saw 1 fiber, glued to an optical element on the 2nd stage, and going to the 3rd stage.
the 1st stage is just an electronics parts stage which seems easy to be removed.
... to be discussed...
|
|
225
|
Wed Oct 2 18:12:54 2024 |
Ronic Chiche | Under Process | issue | lasers and optics | Optical room | CELIA 100W laser amplifier repair |
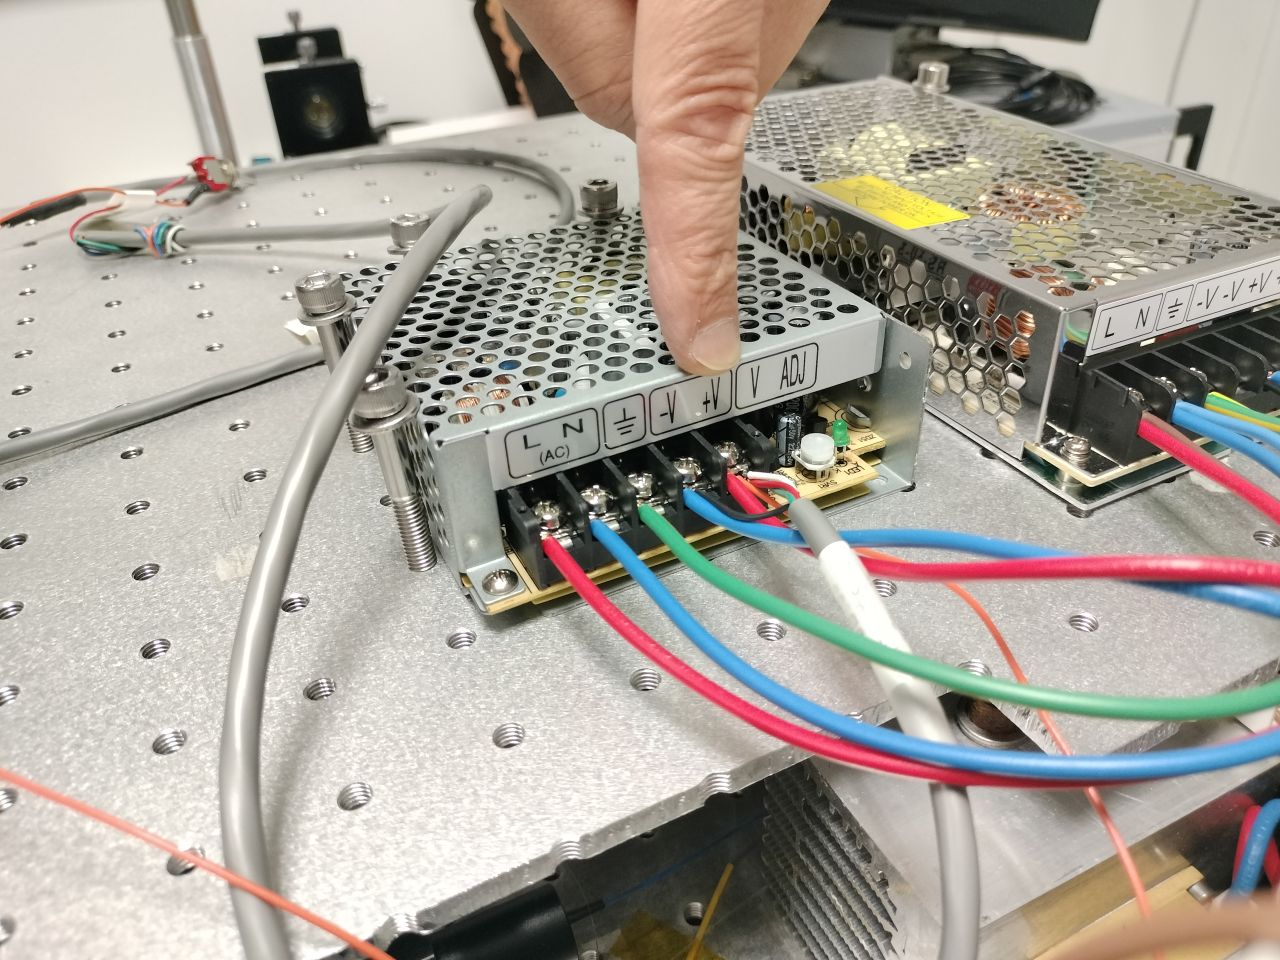
this afternoon, we saw some electric cables badly connected to their power supply.
we fixed it by soldering them together and screwing the result to the power supply.
(see 1st image)
we lift the plate of the 1st stage and we check for optical leakage in the fibers (see 2nd image + picture of the top part of the cassette).
(Aurélien took several images)
without the 1st stage amplification, we saw some lealage only in the bottom part of the "optical cassette".
light was scattered mostly from one side (2 spots) and we saw also very weak scattering in the other directions.
with the 1st stage amplification, we clearly saw the losses from the bent fibers inside the top part of the cassette => it's a good sign.
but after the 5%-10% coupler (the one used for the diagnostic of the power to allow the use of the 2nd stage), we don't see any losses, which means there is no light in this part !
the fiber break could be in between...
Aurélien should send the images to Jérome to get a diagnostic.
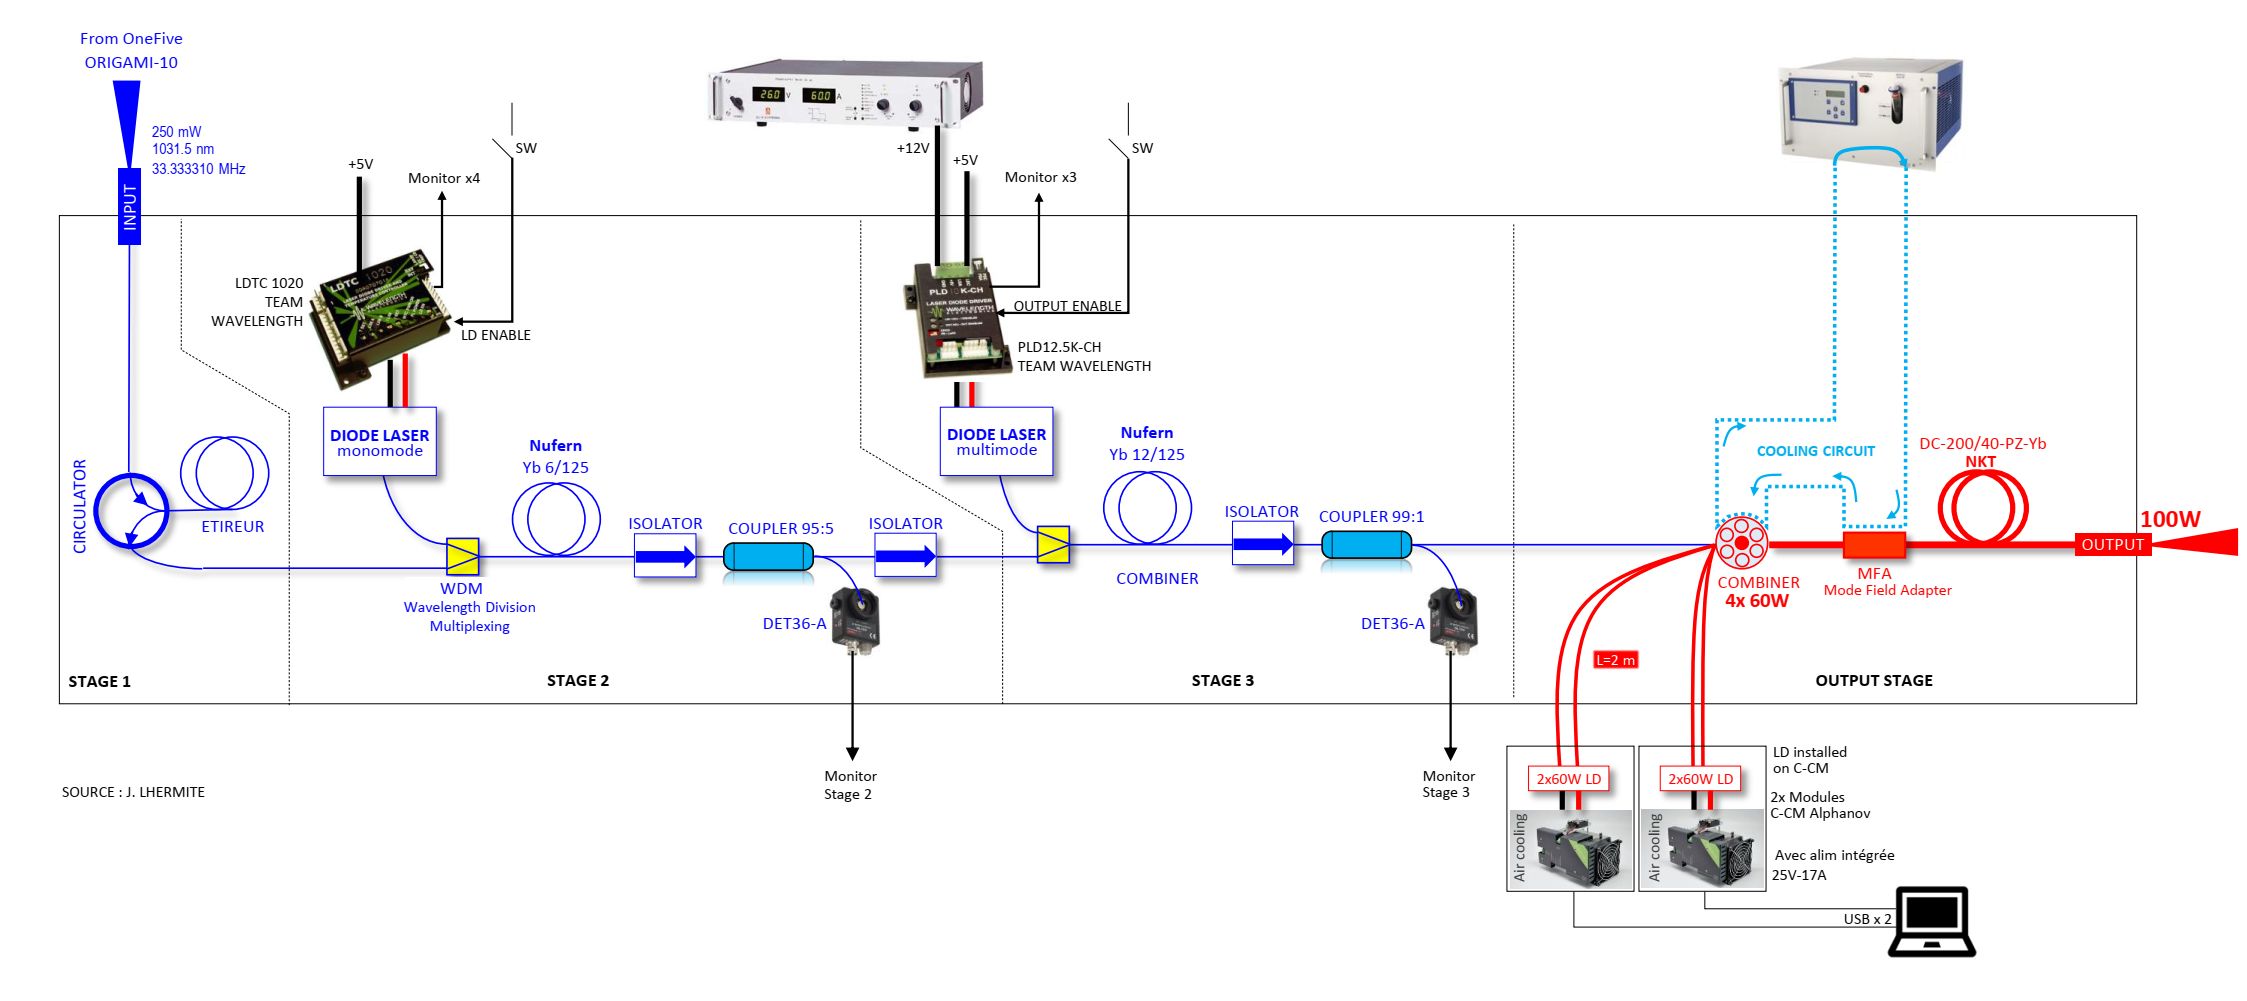
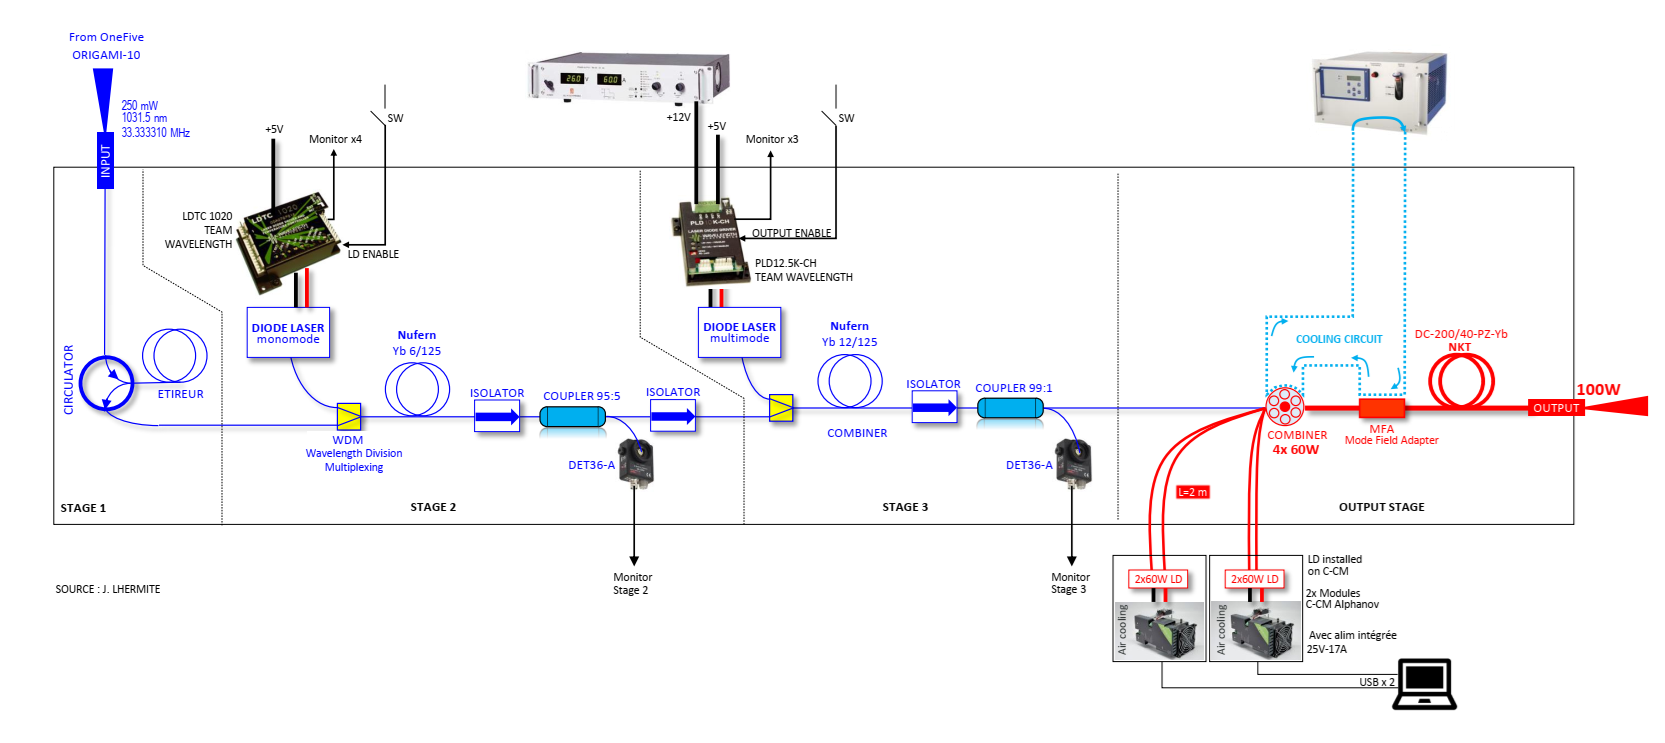
the old schematic is attached but it has been modified in the Loic Thesis (p. 165)
we identified the black optics components as 2 isolators (AFW-PISO-30-1W-FB) and 1 circulator (AFW-CIR-PM-30) from AFW technologies.
| Ronic Chiche wrote: |
|
this morning with Alice, we sent the Menhir 160MHz injected in a fiber (with 6mW at the end of a long fiber) into the laser amplifier, to look for leakage or damage in the first stages of the amplifier (the amplifier is totally off).
first of all, we checked for light scattering around the laser crate with a sensitive optical card => nothing
and then, we checked for light scattering inside the laser crate with an optical viewer => we just saw 1 or 2 small spots located at the end of an optical element at the 2nd stage level.
but it's difficult to understand the optical path and know the different elements with the 1st stage still in place.
we think it is mandatory to open the top of the crate and lift the 1st stage to have a better look inside the optical parts which are at the 2nd and 3rd stage levels:
we could remove the front side of the crate without any damage to any fibers in the crate.
we just saw 1 fiber, glued to an optical element on the 2nd stage, and going to the 3rd stage.
the 1st stage is just an electronics parts stage which seems easy to be removed.
... to be discussed...
|
|
| Attachment 1: IMG20241002144351.jpg
|
 |
| Attachment 2: IMG20241002144936.jpg
|
 |
| Attachment 3: 20241002_161657.jpg
|
 |
| Attachment 4: Clipboard_10-02-2024_01.jpg
|
 |
|
228
|
Tue Dec 3 13:51:52 2024 |
Ronic Chiche | Fixed | info | utilities | Optical room | optical table cleaning |
this morning with Alice and Daniele, we removed all the optics elements and equipments from the SBOX optical table and started to clean it.
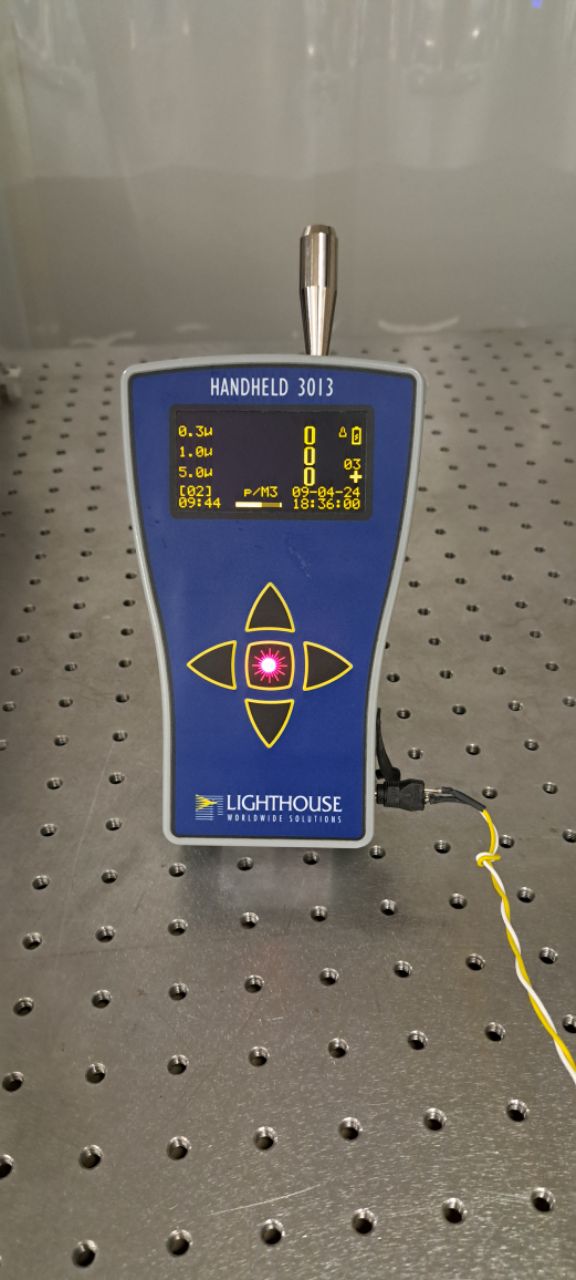
the dust meter count 0 on all particle sizes after the cleaning.
we observed a small part of the SBOX which seems to be oxydised (see picture).
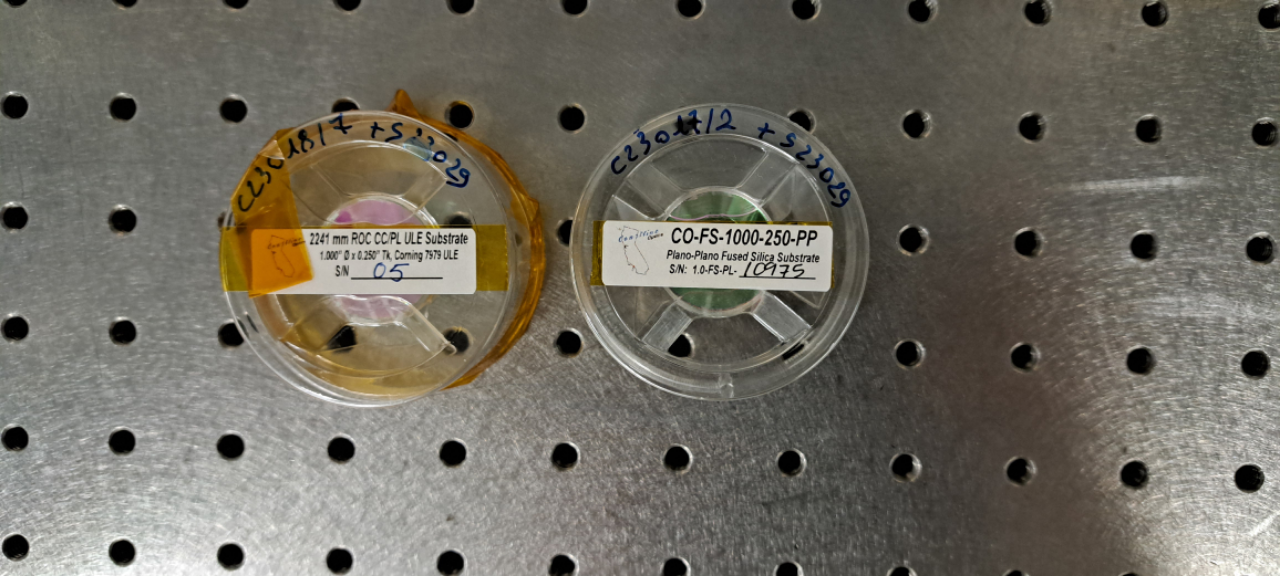
the two previously used mirrors of the SBOX (C23018/7 and C23017/2) were already in their plastic boxes outside of the SBOX.
they are still on the optical table.
we have to decide which mirrors to put in the cavity:
if we don't want to use a "new" ThomX coupling mirror M1, we have to use a Gamma-factory mirror (161185) with T=460ppm for example (we don't have any other FS plan mirrors).
if we don't plan to work at high power in the SBOX for the moment, we could use an "old" ThomX M2 mirror with ROC=2.241m (C1611/11) to avoid any risk of contamination of a "new" ThomX M2 mirror. |
| Attachment 1: Oxydation.jpg
|
 |
| Attachment 2: 20241203_113105.jpg
|
 |
| Attachment 3: 20241203_125359.jpg
|
 |
|
229
|
Fri Dec 6 16:59:57 2024 |
Ronic Chiche | Fixed | info | utilities | Optical room | optical table cleaning |
this afternoon, we checked the dust meter which is at 0 for 1 and 5µm dust particles but ~ 2000-3000 for 0.3µm particles.
we opened the two top panels to let the air flow clean the inside of the vessel.
we observed some other minor oxydised regions (than the one taken in picture) on the external parts of the inox panels but at first sight, nothing inside the vessel.
| Ronic Chiche wrote: |
|
this morning with Alice and Daniele, we removed all the optics elements and equipments from the SBOX optical table and started to clean it.
the dust meter count 0 on all particle sizes after the cleaning.
we observed a small part of the SBOX which seems to be oxydised (see picture).
the two previously used mirrors of the SBOX (C23018/7 and C23017/2) were already in their plastic boxes outside of the SBOX.
they are still on the optical table.
we have to decide which mirrors to put in the cavity:
if we don't want to use a "new" ThomX coupling mirror M1, we have to use a Gamma-factory mirror (161185) with T=460ppm for example (we don't have any other FS plan mirrors).
if we don't plan to work at high power in the SBOX for the moment, we could use an "old" ThomX M2 mirror with ROC=2.241m (C1611/11) to avoid any risk of contamination of a "new" ThomX M2 mirror.
|
|
|
230
|
Mon Dec 16 10:20:56 2024 |
Ronic Chiche | Under Process | issue | lasers and optics | Optical room | CELIA 100W laser amplifier repair |
friday morning, we add a zoom call with Jerome Lhermite about the amplifier repair.
he approximately confirmed the amplifier scheme from the Loic thesis.
he suggested to:
1) identify the circulator ports.
they have some tapes with text written on them.
the goal is to understand if it is still used in the present setup and if a CFBG could still be connected to it (and from which one end could be the fiber seen "broken").
2) use the 5% output tap of the amplifier to check if some light is outed if the input or circulator fibers are injected with 1st stage switched ON or OFF.
3) follow the "broken" fiber to check to which element it is connected to => we should need to unroll the fibers in the bottom "fiber cassette"... :-(
| Ronic Chiche wrote: |
|
this afternoon, we saw some electric cables badly connected to their power supply.
we fixed it by soldering them together and screwing the result to the power supply.
(see 1st image)
we lift the plate of the 1st stage and we check for optical leakage in the fibers (see 2nd image + picture of the top part of the cassette).
(Aurélien took several images)
without the 1st stage amplification, we saw some lealage only in the bottom part of the "optical cassette".
light was scattered mostly from one side (2 spots) and we saw also very weak scattering in the other directions.
with the 1st stage amplification, we clearly saw the losses from the bent fibers inside the top part of the cassette => it's a good sign.
but after the 5%-10% coupler (the one used for the diagnostic of the power to allow the use of the 2nd stage), we don't see any losses, which means there is no light in this part !
the fiber break could be in between...
Aurélien should send the images to Jérome to get a diagnostic.
the old schematic is attached but it has been modified in the Loic Thesis (p. 165)
we identified the black optics components as 2 isolators (AFW-PISO-30-1W-FB) and 1 circulator (AFW-CIR-PM-30) from AFW technologies.
| Ronic Chiche wrote: |
|
this morning with Alice, we sent the Menhir 160MHz injected in a fiber (with 6mW at the end of a long fiber) into the laser amplifier, to look for leakage or damage in the first stages of the amplifier (the amplifier is totally off).
first of all, we checked for light scattering around the laser crate with a sensitive optical card => nothing
and then, we checked for light scattering inside the laser crate with an optical viewer => we just saw 1 or 2 small spots located at the end of an optical element at the 2nd stage level.
but it's difficult to understand the optical path and know the different elements with the 1st stage still in place.
we think it is mandatory to open the top of the crate and lift the 1st stage to have a better look inside the optical parts which are at the 2nd and 3rd stage levels:
we could remove the front side of the crate without any damage to any fibers in the crate.
we just saw 1 fiber, glued to an optical element on the 2nd stage, and going to the 3rd stage.
the 1st stage is just an electronics parts stage which seems easy to be removed.
... to be discussed...
|
|
|
| Attachment 1: Sans_titre.png
|
 |
|
231
|
Tue Mar 4 18:33:26 2025 |
Ronic Chiche | Fixed | info | utilities | Optical room | optical table cleaning |
now, it seems the table is clean enough (dust meter counts 0 particles) to install a 2 mirrors FP-cavity.
| Ronic Chiche wrote: |
|
this afternoon, we checked the dust meter which is at 0 for 1 and 5µm dust particles but ~ 2000-3000 for 0.3µm particles.
we opened the two top panels to let the air flow clean the inside of the vessel.
we observed some other minor oxydised regions (than the one taken in picture) on the external parts of the inox panels but at first sight, nothing inside the vessel.
| Ronic Chiche wrote: |
|
this morning with Alice and Daniele, we removed all the optics elements and equipments from the SBOX optical table and started to clean it.
the dust meter count 0 on all particle sizes after the cleaning.
we observed a small part of the SBOX which seems to be oxydised (see picture).
the two previously used mirrors of the SBOX (C23018/7 and C23017/2) were already in their plastic boxes outside of the SBOX.
they are still on the optical table.
we have to decide which mirrors to put in the cavity:
if we don't want to use a "new" ThomX coupling mirror M1, we have to use a Gamma-factory mirror (161185) with T=460ppm for example (we don't have any other FS plan mirrors).
if we don't plan to work at high power in the SBOX for the moment, we could use an "old" ThomX M2 mirror with ROC=2.241m (C1611/11) to avoid any risk of contamination of a "new" ThomX M2 mirror.
|
|
|
|
232
|
Tue Mar 4 18:51:57 2025 |
Ronic Chiche | Under Process | info | mechanics | lasers and optics | Optical room | Alignment of a 2-mirror FP cavity |
today with Alice,
- we measured the height of the SBOX windows center : 140mm from the optical table.
- we set the laser fiber colimator exactly at this height.
- we placed 2 mirrors to align the future telescope path at exactly 140mm height along the whole possible travel of the lenses in order to keep them aligned.
the horizontal position is also aligned on this path and a ruler has been placed along this path to help to move the future telescope lenses without misalignment.
- we aligned 2 iris on this path to keep this path axis in case of misalignment.
- we placed 2 iris at the center of the input and output FP-cavity windows.
- we precisely aligned the laser beam on these iris.
in the next days, we need to align the mounts in the SBOX and align also the 2 FP-cavity mirrors.
the output mirror will be a "bad" ThomX 2.24m ROC ULE mirror and the input mirror will be a plan 460ppm Gamma Factory mirror. |
|
238
|
Mon Jun 23 14:38:33 2025 |
Ronic Chiche | Under Process | issue | mechanics | lasers and optics | detectors and electronics | Optical room | first attempt to lock |
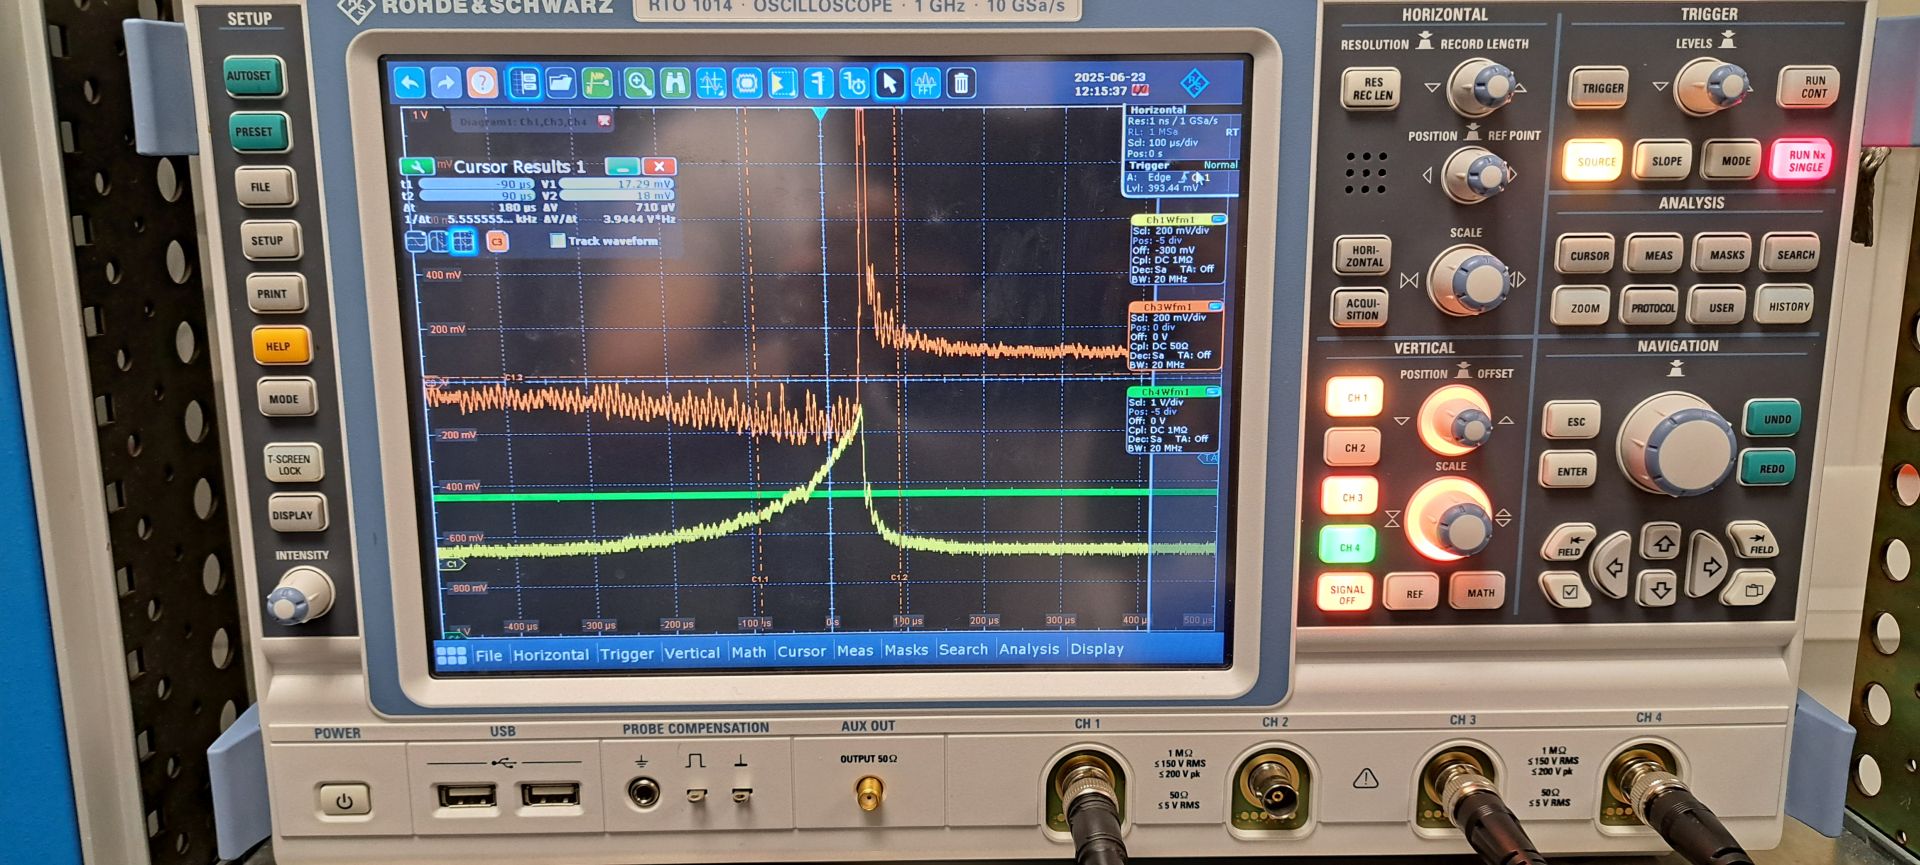
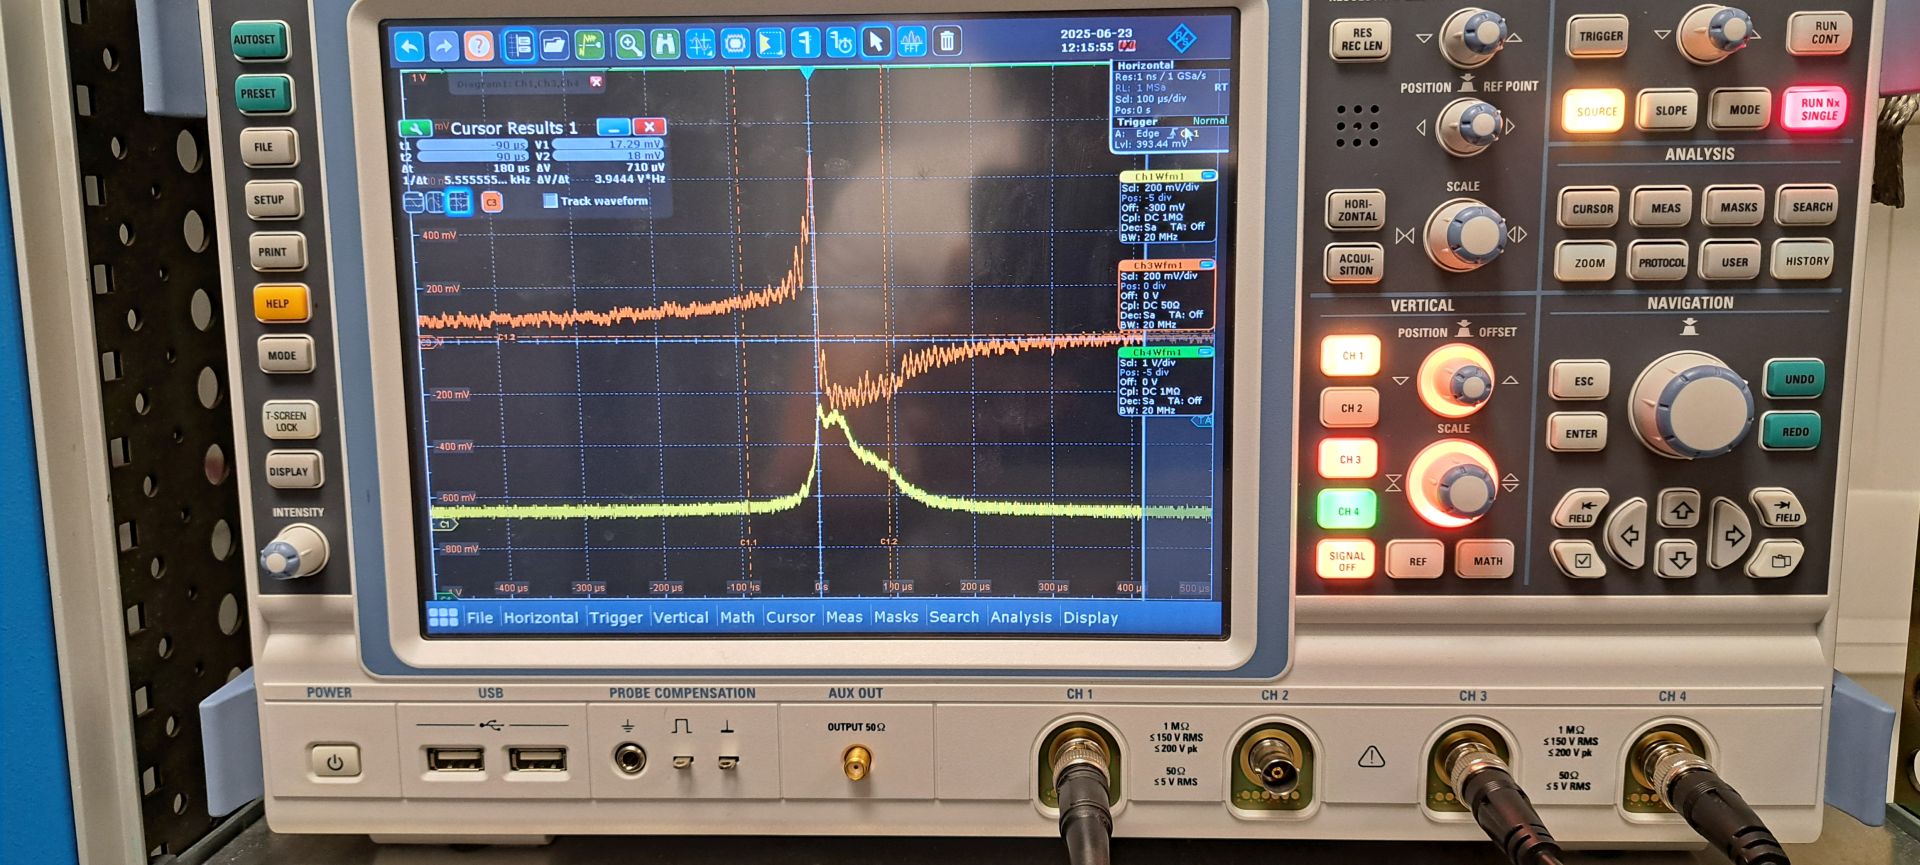
With Alice, we installed the EOWaves oscillator to be locked on the FP-cavity (T1 ~ 2500ppm, T2 ~ 10ppm => F ~ 2500)
FSR = 216MHz => LW = 86kHz.
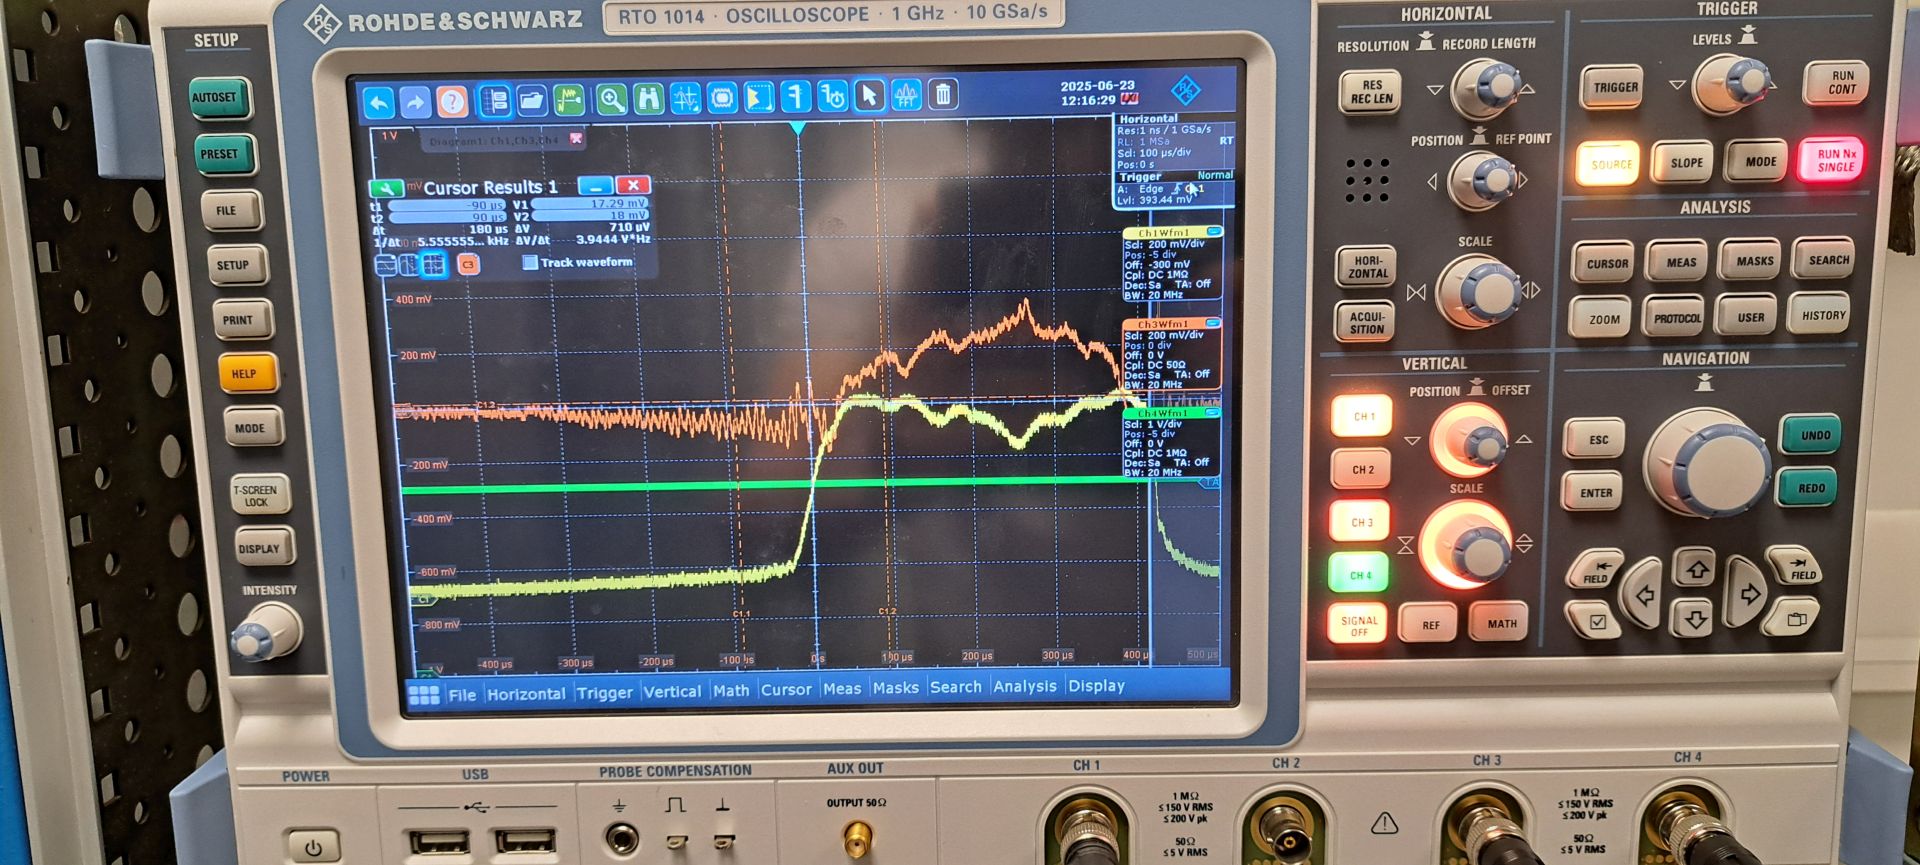
We installed the PDH box, and we got some error signal, but the shape of the transmission signal and error signal is a bit strange...
It grows smoothly, and when the power is large enough, one can see a sudden and fast drop.
Could it be some mechanical problem with the mirrors' mounts ?
I opened the SBOX this morning to do some inspection, and the mirrors seem properly installed in the mounts.
In some rare cases (last picture), the "instability" effect is not dominant, and we are able to maintain a quasi-lock during some 1- 2ms.
But it is still impossible to lock the cavity.
(We did a test with a vacuum in the SBOX at ~2mbar, but the problem is the same.) |
| Attachment 1: 20250623_123816.jpg
|
 |
| Attachment 2: 20250623_123833.jpg
|
 |
| Attachment 3: 20250623_123908.jpg
|
 |
|
241
|
Thu Sep 4 17:35:50 2025 |
Ronic Chiche | Fixed | info | lasers and optics | detectors and electronics | Optical room | Installation of the avalanche photodiode |
After installing the 2nd EOM, we had some trouble to be able to lock again.
One possible reason was the very low signal level in transmission, which is important to trigger the locking system (and stop it).
See the Alice post for details, but we were able to measure only once the Finesse of the cavity at around 2600.
After the Finesse measurement, we opened the box to change the M1 mirror... so the box is at ambient pressure now.
I took back the avalanche photodiode from the Minicav room and installed it on the setup to replace the FPC transmission photodiode.
Now, the transmission peaks are at the 1V level, and it's very easy to trigger on...
The system locked very easily, even without being under vacuum.
It will help if we need to inject very low power laser (e.g. OEwaves after 2x EOM and AOM).
|
|
246
|
Wed Aug 5 11:25:41 2026 |
Ronic Chiche | Under Process | info | mechanics | lasers and optics | cabling | Optical room | Neolase amplifier installation |
we have all the adaptor plugs for connecting the chiller.
so, I tested first the chiller connected in closed loop (on itself).
there is no manual, so procedure is not completely clear...
DO NOT PLUG ANYTHING BEFORE THE CHILLER ASK FOR IT
ONE MUST FOLLOW THE PROCEDURE ON THE CHILLER DISPLAY
1) if the chiller circuit is full of coolant liquid,
one must start by a System Startup -> Draining
(a trash tank and the hose will be need for emptying the circuit)
2) once the chiller circuit is empty
one must continue by System Startup -> Filling
(a clean demineralized water tank and the hose will be need for filling the circuit)
=> OK !
the chiller is able the fill and drain its circuit.
I saw the cooling water circulating in the closed loop.
|
|
247
|
Wed Aug 5 12:22:52 2026 |
Ronic Chiche | Under Process | info | mechanics | lasers and optics | cabling | Optical room | Neolase amplifier installation |
now, I connected the chiller circuit to the amplifier, thanks to the adapters.
chiller IN => blue pipe => laser OUT
chiller OUT => black pipe => laser IN
after several filling and compression procedure, the flow is only 1.7Lpm and the pressure is 0.8 bar.
the temperature has been set to 20°C according to the manual operating range 18-23°C.
the flow is too low !
according to the manual, the flow should be 3-5Lpm !
a very small leakage appears if the mechanical constrains on the pipe is too high.
so, I separated the IN and OUT pipes to release this constrain and fixed the pipes to keep the position.
| Ronic Chiche wrote: |
|
we have all the adaptor plugs for connecting the chiller.
so, I tested first the chiller connected in closed loop (on itself).
there is no manual, so procedure is not completely clear...
DO NOT PLUG ANYTHING BEFORE THE CHILLER ASK FOR IT
ONE MUST FOLLOW THE PROCEDURE ON THE CHILLER DISPLAY
1) if the chiller circuit is full of coolant liquid,
one must start by a System Startup -> Draining
(a trash tank and the hose will be need for emptying the circuit)
2) once the chiller circuit is empty
one must continue by System Startup -> Filling
(a clean demineralized water tank and the hose will be need for filling the circuit)
=> OK !
the chiller is able the fill and drain its circuit.
I saw the cooling water circulating in the closed loop.
|
|
|
248
|
Wed Aug 5 13:49:49 2026 |
Ronic Chiche | Under Process | info | mechanics | lasers and optics | cabling | Optical room | Neolase amplifier installation |
pipes are maybe too long ?
we can use the Darcy-Weisbach + Blasius laws (non linear laws).
I asked to ChatGPT, Claude, Mistral and MathGPT to solve it with these parameters :
L ~ 3m
D = 1 cm
water at 20°C
dP = 0.7 bar
they all found ~ 22-23L/min
so, the tube length should not be the problem... to be investiguated.
| Ronic Chiche wrote: |
|
now, I connected the chiller circuit to the amplifier, thanks to the adapters.
chiller IN => blue pipe => laser OUT
chiller OUT => black pipe => laser IN
after several filling and compression procedure, the flow is only 1.7Lpm and the pressure is 0.8 bar.
the temperature has been set to 20°C according to the manual operating range 18-23°C.
the flow is too low !
according to the manual, the flow should be 3-5Lpm !
a very small leakage appears if the mechanical constrains on the pipe is too high.
so, I separated the IN and OUT pipes to release this constrain and fixed the pipes to keep the position.
| Ronic Chiche wrote: |
|
we have all the adaptor plugs for connecting the chiller.
so, I tested first the chiller connected in closed loop (on itself).
there is no manual, so procedure is not completely clear...
DO NOT PLUG ANYTHING BEFORE THE CHILLER ASK FOR IT
ONE MUST FOLLOW THE PROCEDURE ON THE CHILLER DISPLAY
1) if the chiller circuit is full of coolant liquid,
one must start by a System Startup -> Draining
(a trash tank and the hose will be need for emptying the circuit)
2) once the chiller circuit is empty
one must continue by System Startup -> Filling
(a clean demineralized water tank and the hose will be need for filling the circuit)
=> OK !
the chiller is able the fill and drain its circuit.
I saw the cooling water circulating in the closed loop.
|
|
|
|
249
|
Thu Aug 6 14:49:32 2026 |
Ronic Chiche | Under Process | info | mechanics | lasers and optics | cabling | Optical room | Neolase amplifier installation |
I drained the chiller to install again the short pipe (< 1m) in closed loop.
then, I filled again the chiller and did the compression process to obtain 1bar.
in that case, the flow measured by the chiller is correct about 5.8Lpm.
PS : the correct length for the previous calculation is 6m (2x 3m) and not 3m...
in that case, the flow should be ~ 15Lpm (and not 22 Lpm)
| )Ronic Chiche wrote: |
|
pipes are maybe too long ?
we can use the Darcy-Weisbach + Blasius laws (non linear laws).
I asked to ChatGPT, Claude, Mistral and MathGPT to solve it with these parameters :
L ~ 3m
D = 1 cm
water at 20°C
dP = 0.7 bar
they all found ~ 22-23L/min
so, the tube length should not be the problem... to be investiguated.
| Ronic Chiche wrote: |
|
now, I connected the chiller circuit to the amplifier, thanks to the adapters.
chiller IN => blue pipe => laser OUT
chiller OUT => black pipe => laser IN
after several filling and compression procedure, the flow is only 1.7Lpm and the pressure is 0.8 bar.
the temperature has been set to 20°C according to the manual operating range 18-23°C.
the flow is too low !
according to the manual, the flow should be 3-5Lpm !
a very small leakage appears if the mechanical constrains on the pipe is too high.
so, I separated the IN and OUT pipes to release this constrain and fixed the pipes to keep the position.
| Ronic Chiche wrote: |
|
we have all the adaptor plugs for connecting the chiller.
so, I tested first the chiller connected in closed loop (on itself).
there is no manual, so procedure is not completely clear...
DO NOT PLUG ANYTHING BEFORE THE CHILLER ASK FOR IT
ONE MUST FOLLOW THE PROCEDURE ON THE CHILLER DISPLAY
1) if the chiller circuit is full of coolant liquid,
one must start by a System Startup -> Draining
(a trash tank and the hose will be need for emptying the circuit)
2) once the chiller circuit is empty
one must continue by System Startup -> Filling
(a clean demineralized water tank and the hose will be need for filling the circuit)
=> OK !
the chiller is able the fill and drain its circuit.
I saw the cooling water circulating in the closed loop.
|
|
|
|
|
250
|
Thu Aug 6 15:12:49 2026 |
Ronic Chiche | Under Process | info | mechanics | lasers and optics | cabling | Optical room | Neolase amplifier installation |
now, I installed the long pipes (2x 3m) in closed loop (without the amplifier connected), but the exact ones used to connect the laser, with the same pipe adapters.
after the compression process, the chiller works at 0.9 bar and the measured flow is 4.7Lpm.
so, it's still OK !
after a long time, I observed a small leakage on the "male" adapter on the amplifier side.
| Ronic Chiche wrote: |
|
I drained the chiller to install again the short pipe (< 1m) in closed loop.
then, I filled again the chiller and did the compression process to obtain 1bar.
in that case, the flow measured by the chiller is correct about 5.8Lpm.
PS : the correct length for the previous calculation is 6m (2x 3m) and not 3m...
in that case, the flow should be ~ 15Lpm (and not 22 Lpm)
| )Ronic Chiche wrote: |
|
pipes are maybe too long ?
we can use the Darcy-Weisbach + Blasius laws (non linear laws).
I asked to ChatGPT, Claude, Mistral and MathGPT to solve it with these parameters :
L ~ 3m
D = 1 cm
water at 20°C
dP = 0.7 bar
they all found ~ 22-23L/min
so, the tube length should not be the problem... to be investiguated.
| Ronic Chiche wrote: |
|
now, I connected the chiller circuit to the amplifier, thanks to the adapters.
chiller IN => blue pipe => laser OUT
chiller OUT => black pipe => laser IN
after several filling and compression procedure, the flow is only 1.7Lpm and the pressure is 0.8 bar.
the temperature has been set to 20°C according to the manual operating range 18-23°C.
the flow is too low !
according to the manual, the flow should be 3-5Lpm !
a very small leakage appears if the mechanical constrains on the pipe is too high.
so, I separated the IN and OUT pipes to release this constrain and fixed the pipes to keep the position.
| Ronic Chiche wrote: |
|
we have all the adaptor plugs for connecting the chiller.
so, I tested first the chiller connected in closed loop (on itself).
there is no manual, so procedure is not completely clear...
DO NOT PLUG ANYTHING BEFORE THE CHILLER ASK FOR IT
ONE MUST FOLLOW THE PROCEDURE ON THE CHILLER DISPLAY
1) if the chiller circuit is full of coolant liquid,
one must start by a System Startup -> Draining
(a trash tank and the hose will be need for emptying the circuit)
2) once the chiller circuit is empty
one must continue by System Startup -> Filling
(a clean demineralized water tank and the hose will be need for filling the circuit)
=> OK !
the chiller is able the fill and drain its circuit.
I saw the cooling water circulating in the closed loop.
|
|
|
|
|
|
251
|
Fri Aug 7 10:59:52 2026 |
Ronic Chiche | Under Process | info | mechanics | lasers and optics | cabling | Optical room | Neolase amplifier installation |
I cut a small part of the black pipe on the amplifier side (could it be slightly deformed by a try with an other type of adapter ?), with the dedicated tool, changed the adapter and plugged it more firmly in the pipe (pipe deeply inserted in the adapter).
it seems, there is no more leakage.
measured pressure and flow are 0.9 bar and 4.7Lpm => OK without amplifier.
| Ronic Chiche wrote: |
|
now, I installed the long pipes (2x 3m) in closed loop (without the amplifier connected), but the exact ones used to connect the laser, with the same pipe adapters.
after the compression process, the chiller works at 0.9 bar and the measured flow is 4.7Lpm.
so, it's still OK !
after a long time, I observed a small leakage on the "male" adapter on the amplifier side.
| Ronic Chiche wrote: |
|
I drained the chiller to install again the short pipe (< 1m) in closed loop.
then, I filled again the chiller and did the compression process to obtain 1bar.
in that case, the flow measured by the chiller is correct about 5.8Lpm.
PS : the correct length for the previous calculation is 6m (2x 3m) and not 3m...
in that case, the flow should be ~ 15Lpm (and not 22 Lpm)
| )Ronic Chiche wrote: |
|
pipes are maybe too long ?
we can use the Darcy-Weisbach + Blasius laws (non linear laws).
I asked to ChatGPT, Claude, Mistral and MathGPT to solve it with these parameters :
L ~ 3m
D = 1 cm
water at 20°C
dP = 0.7 bar
they all found ~ 22-23L/min
so, the tube length should not be the problem... to be investiguated.
| Ronic Chiche wrote: |
|
now, I connected the chiller circuit to the amplifier, thanks to the adapters.
chiller IN => blue pipe => laser OUT
chiller OUT => black pipe => laser IN
after several filling and compression procedure, the flow is only 1.7Lpm and the pressure is 0.8 bar.
the temperature has been set to 20°C according to the manual operating range 18-23°C.
the flow is too low !
according to the manual, the flow should be 3-5Lpm !
a very small leakage appears if the mechanical constrains on the pipe is too high.
so, I separated the IN and OUT pipes to release this constrain and fixed the pipes to keep the position.
| Ronic Chiche wrote: |
|
we have all the adaptor plugs for connecting the chiller.
so, I tested first the chiller connected in closed loop (on itself).
there is no manual, so procedure is not completely clear...
DO NOT PLUG ANYTHING BEFORE THE CHILLER ASK FOR IT
ONE MUST FOLLOW THE PROCEDURE ON THE CHILLER DISPLAY
1) if the chiller circuit is full of coolant liquid,
one must start by a System Startup -> Draining
(a trash tank and the hose will be need for emptying the circuit)
2) once the chiller circuit is empty
one must continue by System Startup -> Filling
(a clean demineralized water tank and the hose will be need for filling the circuit)
=> OK !
the chiller is able the fill and drain its circuit.
I saw the cooling water circulating in the closed loop.
|
|
|
|
|
|
|
252
|
Fri Aug 7 11:41:17 2026 |
Ronic Chiche | Under Process | info | mechanics | lasers and optics | cabling | Optical room | Neolase amplifier installation |
as soon as I connect the amplifier to the pipes, the flow decreases to 1.7Lpm.
and the filling process is very long and noisy, as there was something blocking the filling process...
| Ronic Chiche wrote: |
|
I cut a small part of the black pipe on the amplifier side (could it be slightly deformed by a try with an other type of adapter ?), with the dedicated tool, changed the adapter and plugged it more firmly in the pipe (pipe deeply inserted in the adapter).
it seems, there is no more leakage.
measured pressure and flow are 0.9 bar and 4.7Lpm => OK without amplifier.
| Ronic Chiche wrote: |
|
now, I installed the long pipes (2x 3m) in closed loop (without the amplifier connected), but the exact ones used to connect the laser, with the same pipe adapters.
after the compression process, the chiller works at 0.9 bar and the measured flow is 4.7Lpm.
so, it's still OK !
after a long time, I observed a small leakage on the "male" adapter on the amplifier side.
| Ronic Chiche wrote: |
|
I drained the chiller to install again the short pipe (< 1m) in closed loop.
then, I filled again the chiller and did the compression process to obtain 1bar.
in that case, the flow measured by the chiller is correct about 5.8Lpm.
PS : the correct length for the previous calculation is 6m (2x 3m) and not 3m...
in that case, the flow should be ~ 15Lpm (and not 22 Lpm)
| )Ronic Chiche wrote: |
|
pipes are maybe too long ?
we can use the Darcy-Weisbach + Blasius laws (non linear laws).
I asked to ChatGPT, Claude, Mistral and MathGPT to solve it with these parameters :
L ~ 3m
D = 1 cm
water at 20°C
dP = 0.7 bar
they all found ~ 22-23L/min
so, the tube length should not be the problem... to be investiguated.
| Ronic Chiche wrote: |
|
now, I connected the chiller circuit to the amplifier, thanks to the adapters.
chiller IN => blue pipe => laser OUT
chiller OUT => black pipe => laser IN
after several filling and compression procedure, the flow is only 1.7Lpm and the pressure is 0.8 bar.
the temperature has been set to 20°C according to the manual operating range 18-23°C.
the flow is too low !
according to the manual, the flow should be 3-5Lpm !
a very small leakage appears if the mechanical constrains on the pipe is too high.
so, I separated the IN and OUT pipes to release this constrain and fixed the pipes to keep the position.
| Ronic Chiche wrote: |
|
we have all the adaptor plugs for connecting the chiller.
so, I tested first the chiller connected in closed loop (on itself).
there is no manual, so procedure is not completely clear...
DO NOT PLUG ANYTHING BEFORE THE CHILLER ASK FOR IT
ONE MUST FOLLOW THE PROCEDURE ON THE CHILLER DISPLAY
1) if the chiller circuit is full of coolant liquid,
one must start by a System Startup -> Draining
(a trash tank and the hose will be need for emptying the circuit)
2) once the chiller circuit is empty
one must continue by System Startup -> Filling
(a clean demineralized water tank and the hose will be need for filling the circuit)
=> OK !
the chiller is able the fill and drain its circuit.
I saw the cooling water circulating in the closed loop.
|
|
|
|
|
|
|
|
61
|
Tue Jan 5 12:38:04 2021 |
Manar Amer | Fixed | report | lasers and optics | Optical room | Transmission Measurements for the Mirrors. |
- Thursday 10 December 2020: First Test Measurement - Inside Box
- The transmission ( T ) for the mirrors of SBOX and ThomX was measured over a range from the center of the mirror up to 5mm.
-
- The first setup was initially done while the mirrorr is installed inside the metal box, when measuring T we observe that there is an erregular change in the power measured as we move azay from the center of the mirror, this was due to reflection of light inside the box. The reflection from the mirror was reflected on the metal inside the box and it was measured by the power meter.
(so for this setup we only took measrements for T along the center of the mirror)
The file stating the measurements is : Test Cavity _ Mirrors transmission _ Inside box
=======================================================================
- Tuesday 15 December 2020 : Second Test - Outside Box
- The setup for T test was moved outside the metal box with the same distances between the injection beam and mirror ~ 50 cm. and the distance between the injection laser and the mirror next to it ~ 9 cm.
-
- Observation for T is done at full angle and at half angle of reflection ( the mirror was tilted to achive this )
-
- we observed that after each change in the distance from the center the power meter needed to be aligned to have the max power.
- after doing all the measurements for the range from the center we made it again for the center only and the consistance of the transmission was good.
The file stating the measurements is : Test Cavity _ Mirrors transmission _ outside box
note: the laser used for the test is the Koheras
details on the pwer used, mirrors, power meter, filters, ....etc are shown in the Excel data sheets
Done By : Loic , Manar and Ahmed |
| Attachment 1: Test_Cavity___Mirrors_transmission___Inside_box.xlsx
|
| Attachment 2: Test_Cavity___Mirrors_transmission___outside_box.xlsx
|
| Attachment 3: set_up_for_transmission_measurement_outside_box.jpeg
|
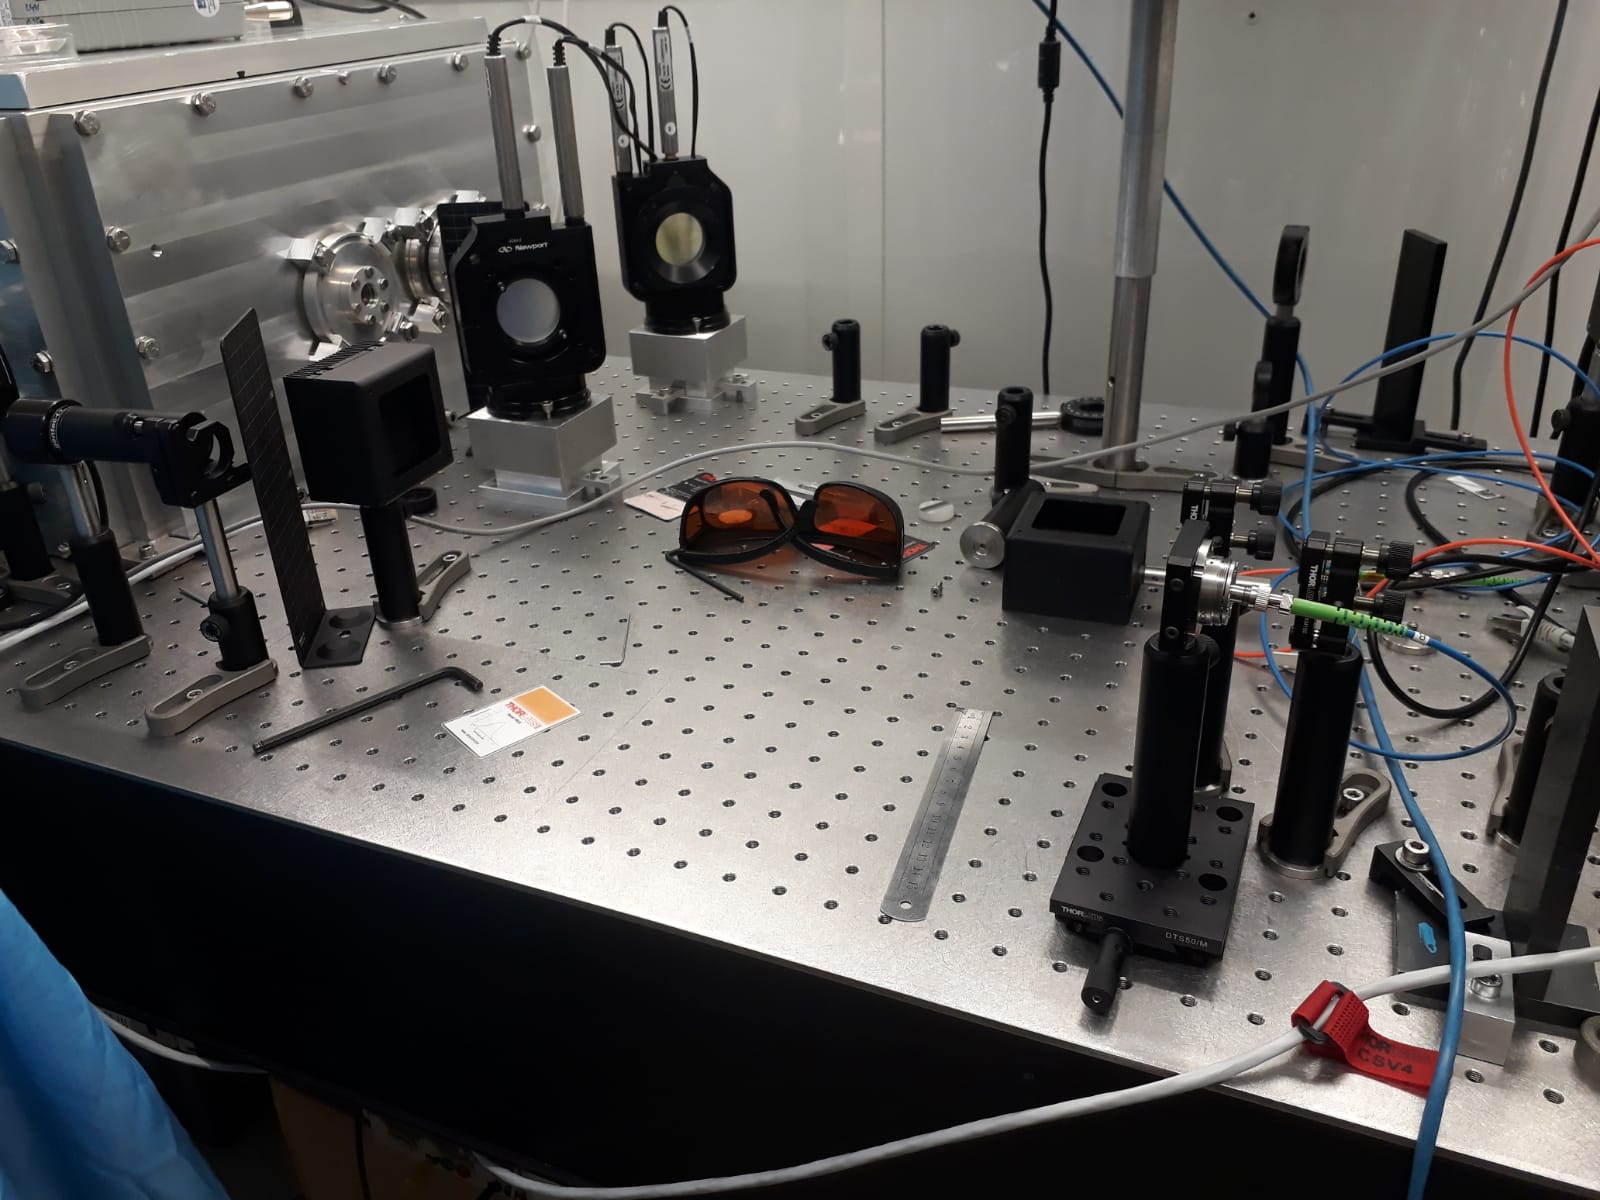 |
| Attachment 4: setup_fot_T_measurement_Injection_laser_and_mirrors_reflected_on_at_angle_and_half_angle.jpeg
|
 |
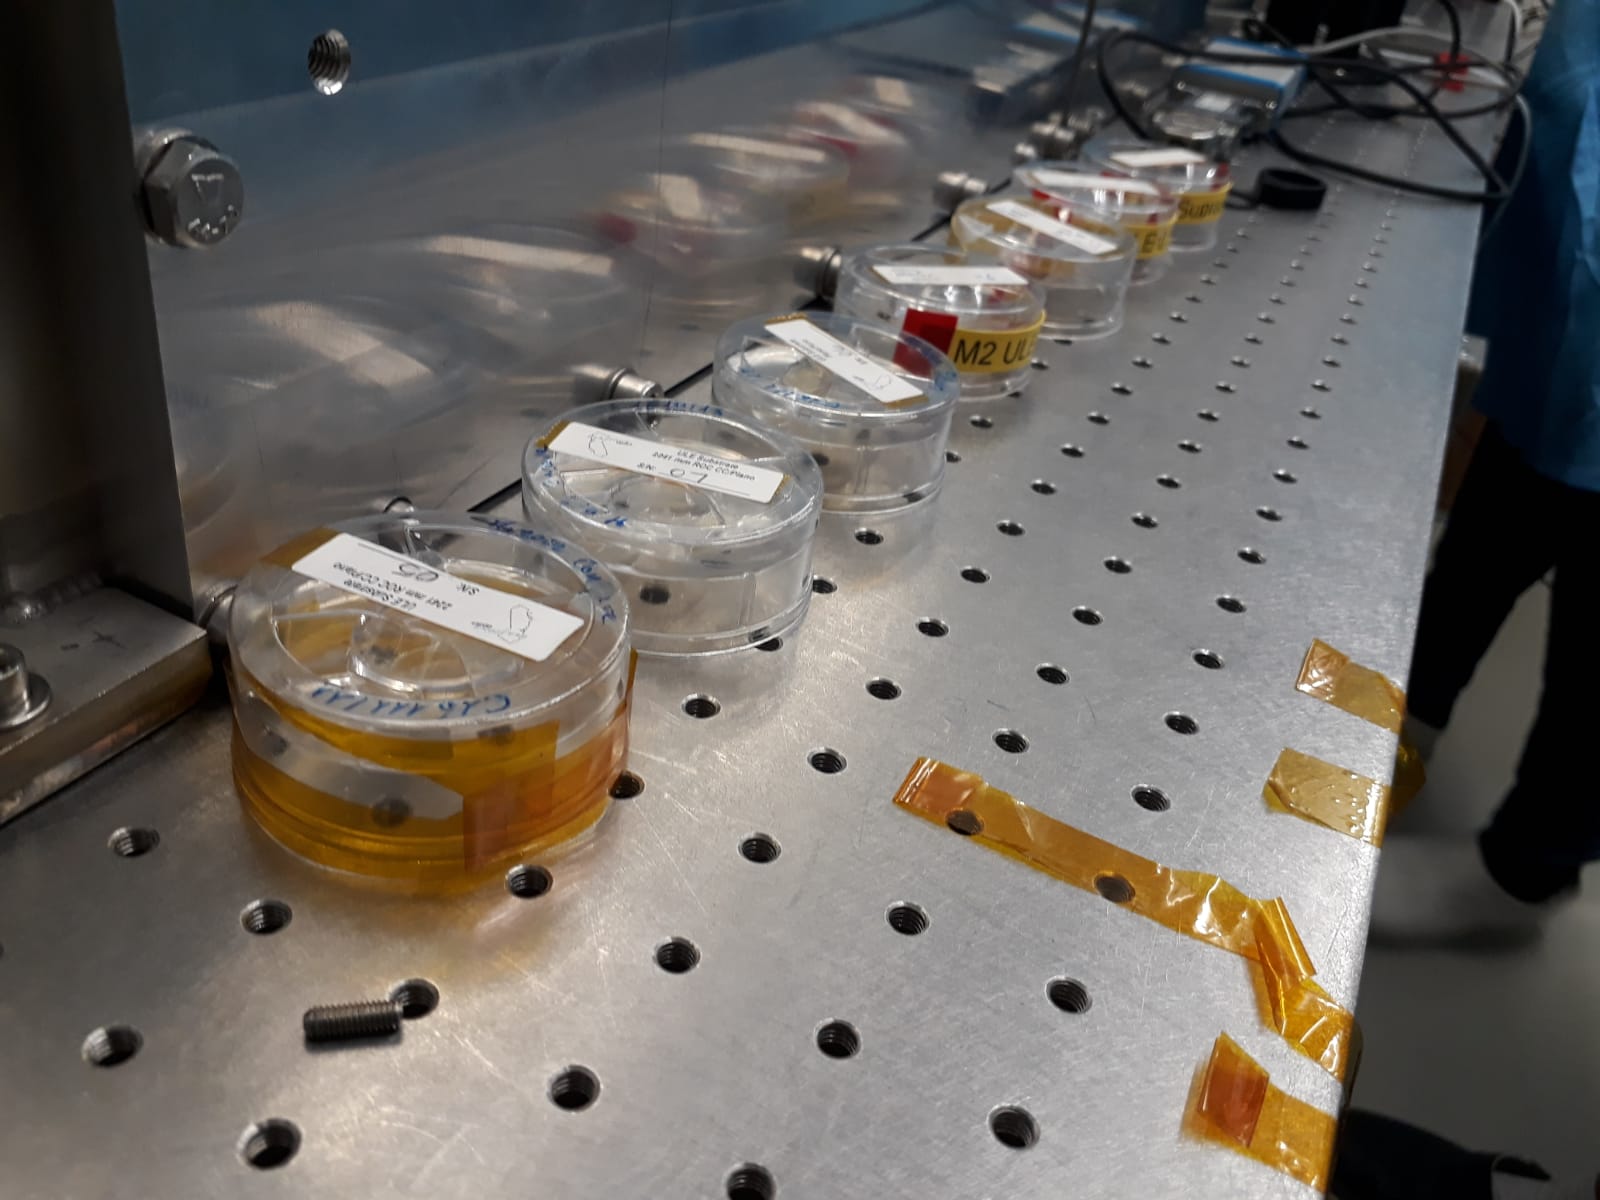
| Attachment 5: Mirrors_Tested.jpeg
|
 |
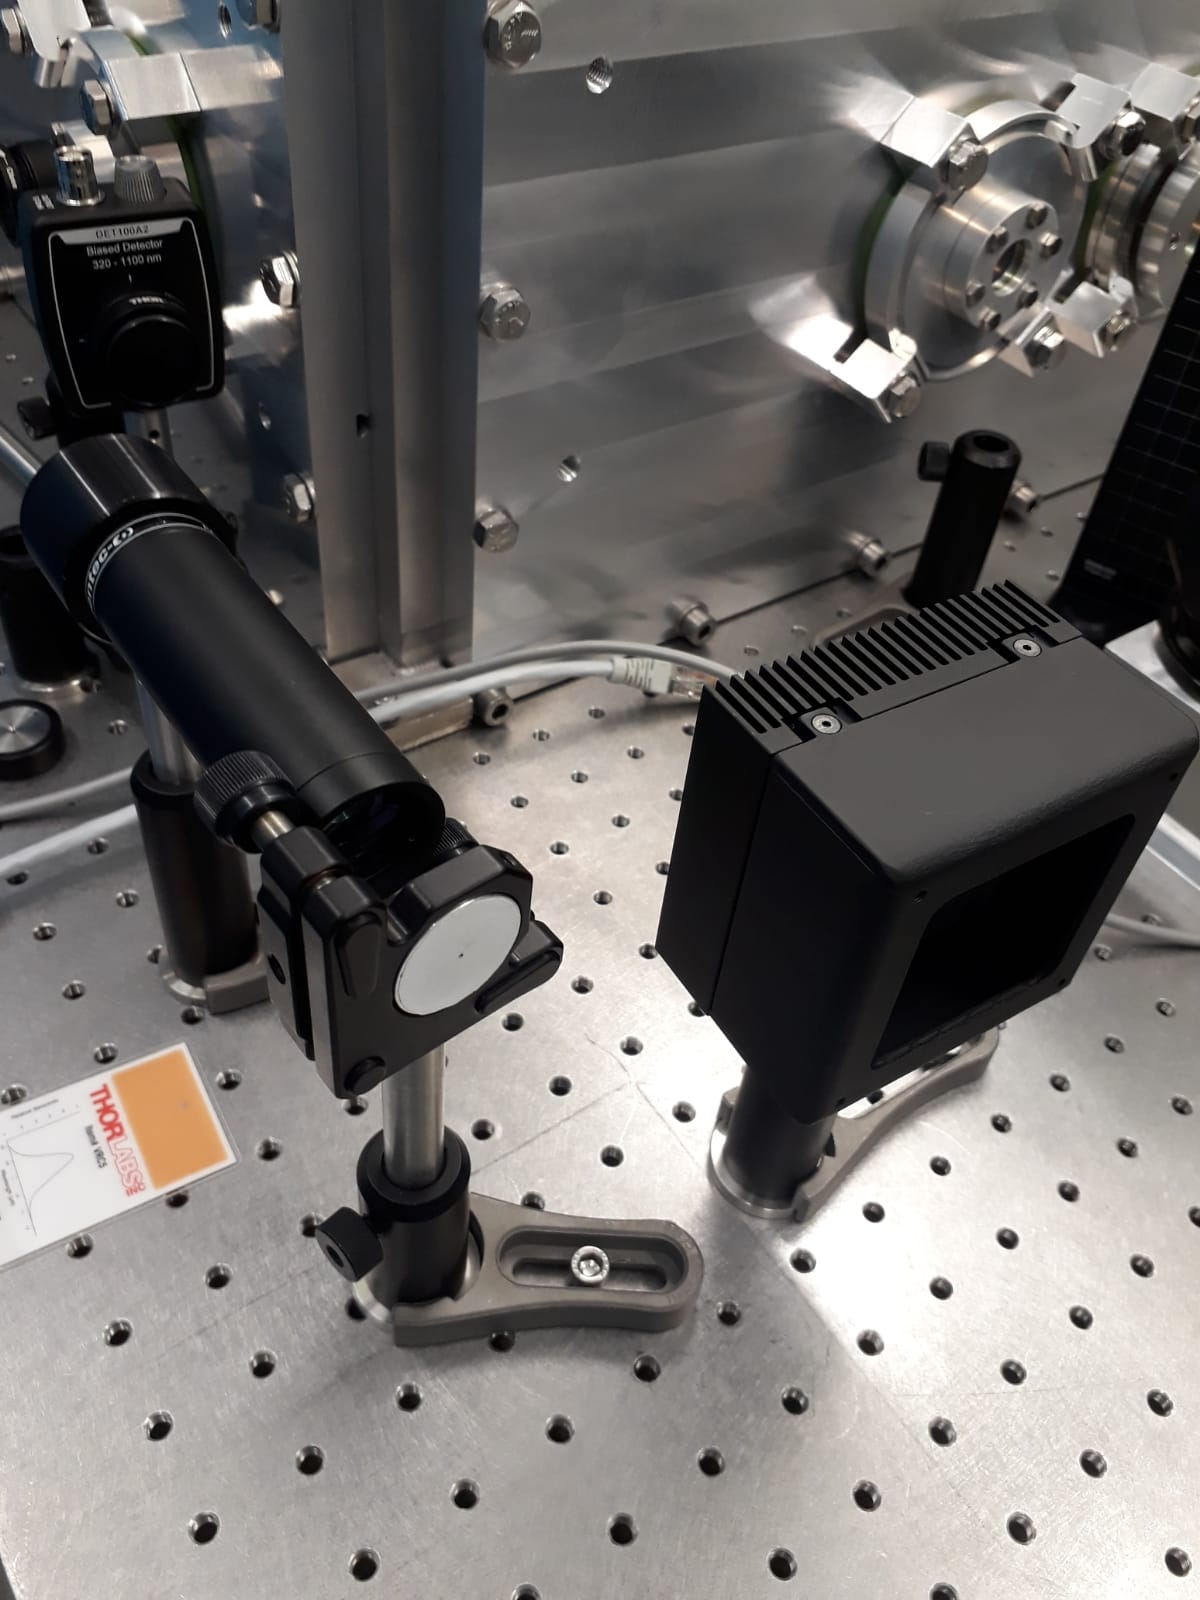
| Attachment 6: set_up_for_mirror_and_power_meter.jpeg
|
 |
|
64
|
Mon Jul 5 14:14:01 2021 |
Manar Amer | Fixed | report | lasers and optics | detectors and electronics | Optical room | OEwaves CW Laser - Phase Noise |
- We started measuring the phase noise on the OEwaves CW laser.
- Class 3b
- wavelength 1.5 um
- The procedure is done using self coupling of the laser
- splitter 50%-50%\
- delay line 100 m
- all fibers are PM type (polarity maintained)
- Photodetector is "lab buddy", very fast diode.
- Note: différance from schematic (we did not use a low pass filter)
|
| Attachment 1: 20210207_OEwaves_laser.jpg
|
 |
| Attachment 2: 20210207_Self_coupling_setup.jpg
|
 |
| Attachment 3: Schematic-setup-for-optical-delayed-self-coupling-detection.png
|
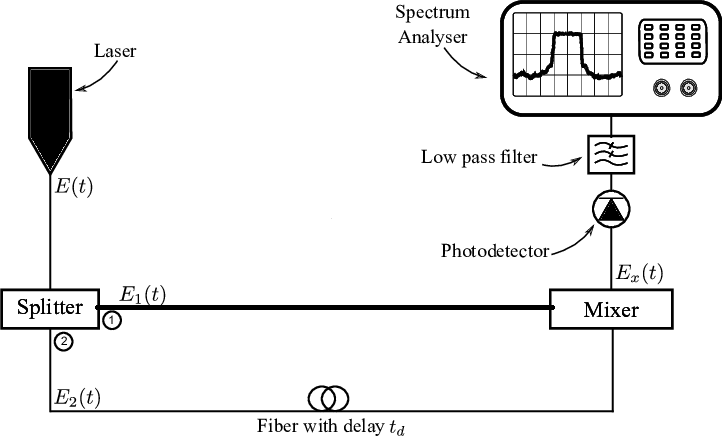 |
|
65
|
Mon Jul 5 14:40:57 2021 |
Manar Amer | Fixed | report | lasers and optics | detectors and electronics | Optical room | OEwaves CW Laser - Phase Noise |
a correction on the wavelength of the laser it is 1030 um
| Manar Amer wrote: |
- We started measuring the phase noise on the OEwaves CW laser.
- Class 3b
- wavelength 1.5 um
- The procedure is done using self coupling of the laser
- splitter 50%-50%\
- delay line 100 m
- all fibers are PM type (polarity maintained)
- Photodetector is "lab buddy", very fast diode.
- Note: différance from schematic (we did not use a low pass filter)
|
|
|
66
|
Mon Jul 5 14:46:44 2021 |
Manar Amer | Fixed | report | lasers and optics | detectors and electronics | Optical room | OEwaves CW Laser - Phase Noise |
correction on unit 1030 nm
| Manar Amer wrote: |
|
a correction on the wavelength of the laser it is 1030 um
| Manar Amer wrote: |
- We started measuring the phase noise on the OEwaves CW laser.
- Class 3b
- wavelength 1.5 um
- The procedure is done using self coupling of the laser
- splitter 50%-50%\
- delay line 100 m
- all fibers are PM type (polarity maintained)
- Photodetector is "lab buddy", very fast diode.
- Note: différance from schematic (we did not use a low pass filter)
|
|
|